I'm in the process of changing jobs and the wait to find out if I have the new job is getting on my nerves a little. So much so that I haven't really been in the right frame of mind to paint anything. I've got eight more Lizardmen to finish off and them I'm going to be painting ten Marine for myself. All ten of the Marines are from the two veteran boxes which were released quite awhile ago. I got the first five from GW, but found the second five from someone at my local gaming club who had no more desire for them. They're really nice miniatures and I'm looking forward to painting them.
I think I'll paint them all as Blood Angels, but knowing me I'll get bored and choose some other color schemes...
Tuesday, September 21, 2010
Friday, September 17, 2010
Macro Photography and Miniatures... A basic tutorial.
Intro:
Macro photography is a bitch. It’s plain and simple. It’s a pain to do it well, and even if you do it perfectly; taking photos of a small object like a miniature and blowing them up for all to view exposes flaws and problems that you usually cannot see with the naked eye, and make all that hard work you’ve done on a miniature look like shit. That being said, it’s also hard to get constructive criticism if you have crappy photos. I often get asked how I take mine, so I figured I’d fire out this tutorial. It’s a little more complex than my last one, but hopefully won’t be too hard to follow.
Taking a photo to showcase a miniature is broken down into four distinct steps: Equipment, Set-up, taking the photo and editing the photo before upload. I’ll look at each step in turn, and outline how I do it, and the tools I use.


Well, that’s pretty much it. I hope this has been of use to someone ^_^

Macro photography is a bitch. It’s plain and simple. It’s a pain to do it well, and even if you do it perfectly; taking photos of a small object like a miniature and blowing them up for all to view exposes flaws and problems that you usually cannot see with the naked eye, and make all that hard work you’ve done on a miniature look like shit. That being said, it’s also hard to get constructive criticism if you have crappy photos. I often get asked how I take mine, so I figured I’d fire out this tutorial. It’s a little more complex than my last one, but hopefully won’t be too hard to follow.
Taking a photo to showcase a miniature is broken down into four distinct steps: Equipment, Set-up, taking the photo and editing the photo before upload. I’ll look at each step in turn, and outline how I do it, and the tools I use.
1 EQUIPMENT
I hear a lot of people whine that good photos can only come when you have a good camera and all the little bits and pieces that go with it. First things first, let’s clear that up. Yes. Having a decent camera will always be a help when you want to take a photo (Shocking isn’t it). But these days entry level cameras will have everything you need to take decent shots of your miniatures. So quit whining and spend a little time getting to know what your camera can and cannot do. So let’s have a look at what I use to take photos:
a. CAMERA: I use a Sony DSC – H7 for most of my photo-taking. It’s small enough for easy use, but still has good features, including a x15 zoom (Which I never use). I purchased this camera the Christmas of 2007 and it has weathered well under the storm of how tough I am on electronics.
b. PHOTO-TENT: I purchased a little folding photo-tent for the simple fact that I am a lazy bastard who prefers to buy things rather than make them. How do I reconcile this with the fact I love to paint miniatures? I don’t. It’s just one of those things that make no sense in my life. Any decent camera store will sell a photo-tent, and they shouldn’t be that expensive. Unless you make a habit of buying and painting Titans or Super Heavy Tanks then you shouldn’t need a large Photo-Tent. Now I can hear some of you switch off at the prospect of spending money on a photo tent, and since I’m such a nice bastard and Google was already loaded I found a photo-tent making tutorial ([url]http://www.photo-info.co.nz/articles/building-homemade-light-tent[/url]). It’s easy and even has a good shot of the lights. Ignore the camera that was used, because that puppy is hooked up to a computer and has a telephoto macro lens and that kind of stuff is waaaaay outta your price-range if you have to read the tutorial and make your own tent… HA!
c. LIGHTS: I’ll say more about lights in a little bit, but for equipment purposes you need a few lights. I usually say one for every side of your tent, minus the back, but you can get away with only two from each side. The lights you purchase shouldn’t be anything majorly special. You don’t need special photography bulbs or flashes. Just go to your local hardware store and get some bed-side lamps with wattage equivalent to 100watts. Most bulbs come in three kinds these days, Cold, Warm and Daylight. You want Daylight. I use eco-bulbs because the white is whiter, which is another shocking example of color physics…
d. BACKGROUNDS: You’ll hear people say that white is fine. And you know what, they’re right. White is fine. But who wants “fine” when you’re taking a photo of something that you’ve invested time, effort and money into?! A decent background serves multiple purposes. So shell out the dollar and print one out you cheapskate! All props for the backgrounds, except the gradient one, goes to Corvus Miniatures (http://corvusminiatures.blogspot.com/). Corvus knows his stuff, trust me... A4 size is good for regular single miniatures, but if you’re going to be taking shots of units, or groups, vehicles or monsters then you may want to pay the extra couple of dollars to get a few of them in A3 or even A2, they’re a hassle to store, but useful… I’ll leave that up to you…
e. TRIPOD: Really? A tripod? I hear you ask. Damn straight. Macro photography is super-sensitive to movement. Thus we want to eliminate all movement. Any tripod is fine so long as your camera attaches to it that is…
So there we go. That’s all the stuff I use when I take photos of my miniatures. It may seem like a lot, but in reality it’s very quick and easy to set up and break down. Next up we put it all together.
2 SETUP
Putting all the equipment together and taking a photo is the next step, but there are still a few things that need to be examined:
a. POSITIONING: First off, find the best natural light available to you. I cannot stress this enough. Natural light will always beat artificial light. ALWAYS. However not all of us live in a picture perfect world, which is why we have lights. You can use a mixture of lights and daylight so position your setup in an area with good natural light. But make sure the natural light is NOT directly hitting the miniature. We use a tent to diffuse light. Have your set up on a hard surface. Nothing worse than trying to take photos on a bed or soft chair.
b. BACKGROUND: One of the keys in using a background successfully is to have the miniature sit on it, and bend it up behind the miniature. NEVER FOLD YOUR BACKGROUNDS! Always have a bend. Having a bend the miniature sits on gives the illusion of forever (Holy crap, what?!). This means the miniature looks like it’s floating rather than sitting on something, and allows you to capture the entire miniature. Confused? Good, welcome to my existence…
c. LIGHTS: Set up your lights so the light is diffused through the tent. There should be NO direct light on your miniature. Direct light creates shadows, especially in Macro photography. Place your miniature on the background and angle the lights towards the miniature. Get right in close to see how it looks.
d. CAMERA: Set up your camera on the Tripod and get it into the position in which you want to take all your shots. When you start taking photos you’re going to want to move the camera as little as possible so each one comes from the same angle. HUGELY IMPORTANT POINT: Macro photography means the camera is REALLY close to the subject. I’m talking almost touching here people.
Your setup should look something like this:

Now we should be ready to actually take a photo…
3 TAKING THE PHOTO
This is the business end of what we're trying to do, but it can also be the most subjective...
a. SIZE: Ignore the size you want your finished photo to be. Set your camera to take the largest shot it can. For my H7 it’s A3 sized, or roughly 8k megapixels. Just work with what you’ve got. We’ll crop and shrink it before uploading, so don’t be worried.
b. CAMERA SETTINGS: OK, here’s the annoying stuff. I can tell you the camera settings I use for the photos I take today, with these cameras, but all camera brands have slightly different settings, and abilities. It’s gonna take some playing around to work out what is best for your camera, but the principles stay the same.
i. MACRO SETTING: This may seem like the most obvious thing in the world, but I swear it’s the most overlooked. The macro setting looks like a flower. MAKE SURE IT’S ON!
ii. THE ‘AUTO’ SETTING: Cameras can only work with what we tell them to work with. It cannot tell if a light source is artificial or natural. But most cameras assume that you’re using natural light. This means that that the ‘Auto’ setting might not be the best one to use. Especially if you’re using artificial lights. To take macro shots I use the Aperture Priority Shooting setting (This is usually the A on your camera). This lets me manually choose the Aperture value while the camera chooses the rest of stuff. It also allows me to manually choose what the light source is via the menu. Here is the Image of the settings when I took these photos:

If you’ve got the wrong light setting, or have the camera on Auto, chances are you’ll get something very yellow, like this:
 |
| From Upload |
iii. ZOOM: For macro photos the zoom is often thought to make things better. Unless you have a special lens the zoom is going to be useless beyond x2.0 magnifications. The idea with a macro is to get closer to the mini. As we’re taking the shot at the largest size possible we can crop and reduce the size of the image to suit, so unless you’re sure what you’re doing. Don’t use the zoom.
c. TAKING THE SHOT: Macro shots are exceptionally sensitive to movement. This is why we’re using the tripod. Additionally even pressing the shutter button can cause a shudder so use the timer on your camera. This can be a little annoying, but trust me it makes a difference.
d. GROUP SHOTS: Take more than one photo when you sit down. I take about five images for every one that gets uploaded. With a range of Exposure Values (That’s what the little EV means). Many cameras these days allow you to take batch shots with differing EV values. IE you press the button and it takes three shots EG: -0.3, 0.0, 0.3 you can then choose which image is best.
When you’ve taken your shot it’ll look something like this, only a lot bigger:

So now you’ve taken some shots. The next step is putting them on your computer and then editing them.
4 EDITING
People will often just take the photos, stick them on their computer and then upload them. But taking a little extra time to crop the photo and resize them for easier viewing makes it more likely that people will take the time to write some comments back. I use a couple of free programs to crop and shrink the images.
a. CROPPING: Make sure you Crop the image before resizing it. Otherwise you’ll get an image which is too small to do any good. I use GIMP ([url]http://www.gimp.org/[/url]). It’s free and it’s good. There are others, but this one works for me. Whatever you use just crop the image so the edges are neat. I've cropped this one quite close to make the point, but leaving a little background is OK too ^_^
b. RESIZING: Now even after cropping, chances are your image is still going to be huge. This is where resizing comes in. You can use GIMP to do this if you want, but if you’ve taken a few photos it can be tiresome. Pix Resizer ([url]http://bluefive.pair.com/pixresizer.htm[/url]) can do all the images in one hit, which makes it quicker. Which will leave you with your finished image:
 |
| From Upload |
You generally want the largest dimension to be about 700pixels. But anywhere before 650 and 800 is generally acceptable. And you’re done! Upload and show them off!
Monday, September 13, 2010
Slacking off...
Slacking off is far to easy... I've been playing a lot of poker recently... I know I should be painting, and yet I can't find the motivation to do anything right now... Meh... I'll start again soon I know... I did make money playing poker, which has been enough to buy more miniatures, so it's not a total loss... Right? Anyone? Anyone? Buller?
Tuesday, September 7, 2010
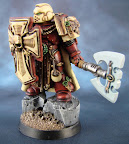
Shadow Sactus Assault Marine
Finally got around to finishing off this trade marine... I swear I'm getting slower at painting... First off, the photos are not that great. Bad weather, and only two lights equals a slightly washed out red armor. I've really tried to push the blending, and while it's only worked to a certain extent, the photos don't show the true finished color that well.
Done today:
Added Snow. Mix a bit of snow flock up with PVA glue and apply. then dust some more over the top to make it all sparkly.
Back Pack: The very bane of my existence is a SM Back Pack, I stab thee in thine eye... Standard colors, just annoying...
Writing: I was thinking of making this a ribbon thing and having it be all different colors. Then I realised I was painting a SPACE MARINE, not an eldar... :D
Knee Pad. Nothing shocking. Just made it Blue. *GASP!*
Music listened to: Wicked Original Cast Soundtrack... Showtunes ftw!
Thought for the day: Why does 'watching paint dry' get a bad wrap? Water leaches from the paint into the air and leaves behind a solidified form! That's bitching! And I've been drinking to much coffee... Weeeeee... Pictures!


Friday, September 3, 2010
Shadow Sanctus Assault Marine WiP Shots
Geeez, it's been a really long time since I've painted a Shadow Sanctus Marine!
The Shadow Sanctus (Or Saints if you don't know your latin) is a Blood Angel Sucessor Chapter whose Gene Seed was mixed with Ultramarines to give it some stability. Well... That's what I say so I get to use some oh so pretty blue for the veterans...
I've been putting this guy off for a very long time; for which I owe IceAngel (A member of DAKKA DAKKA forums) a massive apoligy. I got his marine the other day and that got me off my ass to stop the lizards for a little bit and get this guy done...
There's a whole bunch of things all over him which still need to be done; completing the red is the largest. More highlights required... The gun also needs a lot of work, the pack needs to be started (cringe)
I tried a new eye technique on him, but am not overly happy with the results, they look a little strange...
Egads, I wasn't meant to do the base either... Got a little carried away, so I'm going to have to finish it now... I have some snow features which I'm going to add in there, but I'll leave a space for the ice crystals that IceAngel uses...
Colors:Armor: Basecoat is a 2:1 of Scab Red and... And... Ummm it's all mixed up already and was done a long time ago... I think it was scorched brown? Not sure...
Gun: Chardon Granite then Black Wash with Highligthing still to come
Helmet: Ultramarine Blue (3x thin coats). Recesses are done with watered down Blue wash. Highlights are done with UM Blue and Menoth Base, the mix of Menoth gets heavier the lighter the highlight.
Robe Front: Foundation Purple color (If someone can tell me what that's called, my label has come off) then Purple Wash. Highlights are done the same way as the helm was. Mixing the base with Menoth.
I think that's everything? Mwahaha Even if it's not I'm stopping here, you've all read enough of me yakking on...


Thursday, September 2, 2010
Temple Guard Test Figure
Alrighty, finished my Temple Guard test figure. It's quite simple when I look at him now, but it took some redoing of parts over and over again.
The biggest of all is the shield. Going from the green to red seems like such a no brainer now, but if you'd told me to do it before I would never have thought of it. But that's why I like to post WIP's, so people can give me pointers and ideas. Shield is Mechanite Red, then a devlan Mud wash with a blood red for the rim ridges. The cream is menoth base and menoth highlight a little brightness. Also changes the cream from the bone.
I'm kind of tempted to redo some of the bone, but I probably wont...
The eyes are simple yellow dots. I was considering going for something like slits, but this is meant to be speed painted... Which I suck at, but you get that...
Someone else also said the blade looked very dull so I went with black and then granite for a single highlight.


Subscribe to:
Comments (Atom)