Showing posts with label Trade Marine. Show all posts

Thursday, August 2, 2012

 Finally finished the Diorama!


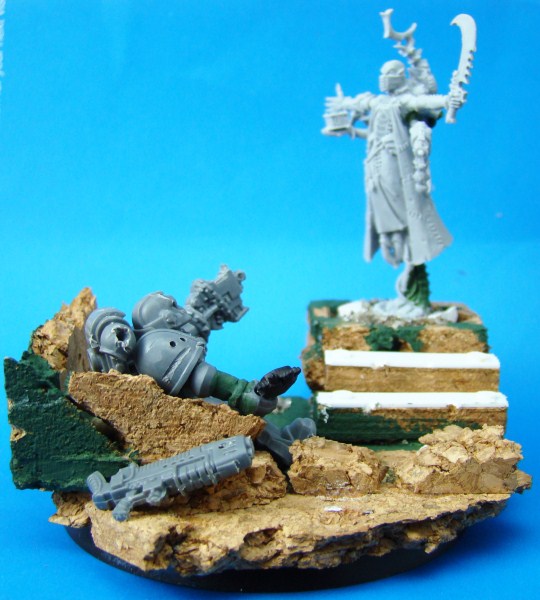
Marine and Dark Eldar:


Friday, June 15, 2012


IT CONTINUES!

Here is the start of the Dark Eldar mini to go with the diorama. It's for Xarboth over at 40k forums.com. I needed to check with him that the blue was appropriate. He said to go nuts with it...So I did...


More of the blue. Still some more to do, a few more layers and washes and layers... Some people said not to go with blue up around his head cloth, but it seemed appropriate. You can be the judge. :)


EDIT: I had to stop using my WIP backgrounds. The blue was too close to the blue used.

EDIT: I can't stop singing "I feel pretty... Oh so pretty..." Every time I look at the miniature... I think I Should be concerned...

Wednesday, June 13, 2012

Mini Diorama Continues...

More work on the Diorama. Mainly Battle Damage. Rawr! ^_^


Wednesday, May 23, 2012

First we build them up... Then we tear them down... Wait that's wrong...


Holy crap an update... Despite a lack of feedback I've gone ahead and made the marine an Imperial Fist. This required me to actually look up the Imperial Fists, never done one before, but the yellow is fun to paint... Although I'm going to weather and battle damage the hell out of it before I'm finished... :D


Done today:

Base:
 - Ground was a terracotta brown / red. Then I've gone over it with one layer of weathering powder. It needs more work. I'm thinking a water / muddy effect would be nice.
 - Stone work. From Black highlighted with grey all the way up to white at the top. Weathered with some powder to give a used look.

Marine:
 - Imperial Fist! Used a mix of Moon Yellow and Sepia ink to make the base coat. Glazed with a sepia then used Moon yellow to do the first stage of armor again. I've gone over the recesses with darker washes and then the very depth with a dark brown ink.
 - Bloody red to do the base coat of the red, then mixed with flesh (2:1 red : flesh) to highlight it.

Dark eldar:
 - NOTHING! I am the slack... It's not even undercoated yet!

Monday, April 16, 2012


I have another trade marine for someone at 40k Forums. He chose the miniature, I have free reign on everything else, thus I went over the top... Who'd have thought that would of happened?!

So, finished the first stages of building the base for the trade marine. Still gotta do some work on things...


Monday, April 25, 2011

Don't ask me how he uses the weapon...

Sorry for the delay WhaleMusic, but with Zombie Jesus statutory holiday and ANZAC day and insane robots trying to kill me I've been busy... Oh so very busy... ^_^

Completed Shadow Sanctus Captain! Hooray!


More stuff I've done:
- Tried to tone down the purple highlights and tie them together with a few diluted washes. Result: Mixed success. The front ones look OK, but now they've lost some of their pop. The back ones, who can say... I've been looking at them too long ^_^
- Gem Stones are done. Not happy with a couple of them, but only noticed the problem when they're blown up on the photos... Usual method of doing them, just using the greens and yellows instead of the red, orange and yellows...
- The backpack! I've said it before I'll say it again. I dislike Space Marine backpacks. They're boring as hell and seem to take forever... Pain in the ass...
- Completed the Base with one more drybrush of a light grey and then added some brown plant stuff. No clue what the model name is...

Stuff I'm not happy with:
- The handle part of the weapon under the guard is rough as hell. If I'd noticed it before hand I would of tried to chip away some of the superglue build up, but I didn't. Bah...
- No freehand... Again... Sorry Whalemusic, don't feel confident to slap some freehand on him so this is how he ends. I know I should be trying it, but honestly I didn't have the heart to screw it up and have to fix what I've shanked...

---

This ends my Trade Marine Obligations... I think? Anyway, I'm moving onto a project for myself next. It involves 12 miniatures, all ordered from GW Direct which cost me an arm and a leg... But I wanted specific miniatures... If anyone wants to guess about what the 12 miniatures are for shout out... I'll give you naming rights of one of them if you get it... Hmmm what has 12 miniatures in a GW game?
Posted by Picasa

Wednesday, April 20, 2011

Day two of this trade marine. Obvious additions are the head and the arm. I'm liking how it's all coming together... Took some extra special attention with the head & I think it's paid off quite well.


Done today:
- Smoothed out the purple a little bit. I felt the transitions were stringy... If that can be used to descibe painting?
- The helm is done with Bolt Gun > Base Gold (Andrea Paints). Then a glaize of Sepia, then detail lines with Orgyn Flesh, then Devlan Mud and then finally black. To highlight the gold I used base again followed by White Gold (Andrea Paints).
- The eyes and head gem were done with my regular gem technique. I might have to redo the left eye (His right), it looks a little funny...
- The Base: Pretty simple, did four layers of greys, each drybrushed...

To Do:
- Detail work: Gems, parchment wording, etc. - I'm a little unsure about what color to make the leg laurel, I was thinking gold, but I might be a little overboard on the gold, maybe green? - A little more work on the weapon. It's a dark grey right now, might lighten it up a couple of touches of grey... - The Backpack! Crap! I forgot the backpack... AGAIN! *sigh* - Anything else I can think of, or get told about from all of you :D
Posted by Picasa

Monday, August 9, 2010

Trade Marine - Day Nine. DISASTER STRIKES!

I've been waiting for it to happen. With every miniature I do there is a moment of disaster. Sometimes it is a minor thing easily correctable, other times it is catastrophic and deserving of a Simple Green Bath and stiff toothbrush. Today was a middle of the road affair with the cloak encountering the side of a paint pot which had spilled leaving a massive coat of green all over the purple. Acting quickly (And modestly... HA!) I used needle nose Q-Tips to soak up as much of the excess as I could with blotting (never wipe a paint spill, always blot). Then I used an eye-dropper to dilute what was left and blot it again. I did that a couple more times. Then I left it to dry. The result wasn't that bad. most of the green was gone, but there were flecks running throughout so I decided to recoat and start again... I went super thin with the paint and did three coats. The turnout is OK, slightly darker than the original, and slightly raised surface in places... Despite the setback I continued with doing detail work over the entire figure (I would normally go and destroy things...). Anyway, here is today's breakdown...

Gems: I use to have massive trouble with gems, I'm talking shockingly bad; and while I'm not perfect at them, I've gotten better... I've never painted a green Blackstone gem before. But figured using the same basic principles as my red ones with mostly the same colors as doing the eyes would work, thankfully it did. ^_^ The trick with doing Blackstone gems of any color is to let the black do the job for you. Small lines of paint, with ever lighter and smaller lines over the same bit. Finally you need to do two dots, one the highpoint of the color (in this case pure yellow) and then a tiny dot of off-white on the other side of the gem in the black. The result is something that fools the eye into thinking you've got a full gem, when in reality you've done this tiny work... Requires a little but of practice, but I like them. OH! And after 72-hours a touch of hi-gloss sealer over the entire gem. Really makes it sparkle. These ones done have the gloss yet, but you get the idea...

Weapon: Finished it off. I wanted an off-focal point which wouldn't detract from the face, so the light grey with blue trim works well enough for that. It's the only thing which has that color on the figure, but it isn't a striking color... I'm not that good at power weapon effects so this was a cowards way out... Tee hee hee... ^_^

Cloak: As you can see I've also added some rather rough highlighting. Alot of people use white for raising a color, but I've found that all it does it sap color. I've used the same cream as the helmet to lighten and it seems to have worked quite well... I am unsure whether I wish to now risk a pattern over the purple. It already has so many coats of paint... Plus there's still a pack to go on there... I might wait and see how it looks with a pack before deciding...

Detailing / Writing: In case you can't tell it says Valor on his leg... I like the word Valor as it has go sharp points... I get a lot of people asking me how I do my writing. Short answer? I cheat! Mwahaha! I use a Steadtler Professional Pen 0.5 size... Is that cheap? Maybe. Does it get the job done? You bet!

Oh! I also attached the head! Just in case you didn't see that ^_^[


Posted by Picasa

Trade Marine - Day Eight: Cloak and Daggers! Well Axe's really... ^_^

It continues! Small steps seem to be the way for right now... Silly work getting in the way... What do I need money for... Silly rent, food and lifestyle... Bah ^_^

Today:
Cloak started. Took some advice and made the inside cream. I think it frames the front of him quite well. The back has the basecoat and some washes on it. Still need to highlight it and probably add some gold trim in there somewhere. Cream might of looked nice, but I am partial to purple...

Buckle thing done. Gold and Green. Still can't believe I didn't think of green for the Laurels!? Looks good too. It's a shame the shield will cover 95% of it ^_^

Weapon started. I wanted the weapon to look like a relic and went with this very light grey. Going to rim it with a watered down blue wash and probably feather some white onto the sharp points. I don't know if I like the silver of the mechanical part with the white blade parts. They're very similar, maybe redo them in gold?

I've been playing around with maybe leaving the shield off as well... Going through my bitz box I found a nice storm bolter that might work... and there's a few other things I could try... I might have to model some choices...


Posted by Picasa

Saturday, August 7, 2010

Trade Marine - Day Seven: Leather & Buckles & Bling! OH MY!


Omg day Seven... Kill me now! Hehehe, nah it's not to bad really... Rainy Sunday afternoons were designed for painting me thinks; especially in winter... Anyway, he's finally starting to come together; adding more color always seems to help.

Worked on today:
Armor: Did a few touch ups on the red armor; hopefully lifting the brightness in places and correcting a few blends in others. I don't think I can risk adding anymore paint to the red, it's already pretty thick so this might be the final red, except for touch ups... ^_^

Seals and Parchment: Green for the seals was a no-brainer. Connects with the eyes, and gives a change from the browns and creams. I'm not totally sold on the color of the parchment yet. Looks a little to similar to the cream. Maybe another layer of sepia to tone it down a little. Maybe even a slightly watered Flesh wash over it...

Leather: I'm really bad at leather. Like Catastrophic bad. I have a lot of trouble with it. I've tried blending it, I've tried drybrushing it. Hated them all... Hence I usually cop out with the wash heavy method you can see.

Sweet Zombie Jesus... I'm a slow painter :D

RECIPES:

Green Recipe:
Dark Angels Green Base
Goblin Green touch ups
3:1 water / Scorpion Green touches
Green wash
1:1 Water / Sepia wash to darken the recesses.

Parchment Recipe:
Bleached Bone. Many layers.
x2 Sepia washes (Maybe another)

Leather Recipe:
P3 Knacksack brown
Devlan Mud x2
Highlight with thinned Knacksack brown (You'll be able to see wear it goes as the wash will be lighter)
Sepia wash to tie the highlight down.

Now I'm at a real loss of what color to do the cloak and the waist buckle thing. The Buckle needs to a light color. Either Gold or Cream. The cape I'm thinking purple... So help me pick! Tell me what you think it should be! Chances are I'll just do what you tell me... I'm weak like that... ^_^

Posted by Picasa

Thursday, August 5, 2010

Trade Marine - Day Five: Still working that body...


I'm at the point where I'm not totally sure how this miniature is going to come together. I have questions about the shield colors, the weapon colors, how the red is working, the cape, etc... Experience says these problems will go away when I keep working on the miniature but it's still annoying... The lack of good light for taking photos has exacerbated this too... *grumble grumble*

Done today:

More red work; had an issue with the weapon arm front and needed to fix it, but has left the blend a little stagnant. The breastplate is looking a little weird as well, might have to have a closer look at that...

The first coat of metallics are on. Nearly everything that is silver will soon be gold, or bronze. Only thing that won't get another pigment color is the key, but that will be weathered with washes. I've also made the flexi-armour joints silver with heavy black in the recesses. I know Roleplayer leaves them black, but they'd be voids in this guy...

Yes, I know the right knees pad icon still has a touch of black in it... But it's all going to be gold... And there's gonna be a big ass shield in front of it ^_^
Posted by Picasa

Wednesday, August 4, 2010

Trade Marine: Day Three - You call this an update?! This ain't no stinking update!


It's red! This must quite simply be the laziest painting blog post known to man. Ah well, you can't win them all... I did the base coat of red using multiple thin layers of scab red. I then washed the all the red with Baal Red, then started doing the recesses with Sepia, Flesh and Devlan.

For the red to work properly I think I might have to do one more with Black, just very thinly. Maybe with a touch of paint added to give it a little bit of sticking...
Posted by Picasa